Showing posts with label Cricut. Show all posts

Friday, November 18, 2011

3D Ornaments

I cleaned my scrapbook room a bit yesterday to unbury my Cricut machine and desk. My doTERRA business has taken over my room and my scrapbooking needs some love!


I made this ornament using an ornament shape, my Sure Cuts A Lot program and my Cricut. It is 9 inches tall. I cut out 4 of the ornament shape, then 4 of the round top shape and then 4 of the metal topper shape. I scored them all down the middle so it would be easier to fold and then I used adhesive squares to put it all together. I did put a line of wire down the middle before I adheared all four pieces. I used this wire to add a little bling on the bottom. Next time, I am going to glue the wire down the middle so it will not feel so loose. I added ribbon to the top and look how pretty!

I want to grunge the next one up just a bit, so if anyone has any ideas, please let me know!!

Wednesday, May 4, 2011

Cricut Swap - April


I participated in another swap at Cricut.com . It was fun and challenging. The categories where "Let the music move you", "Tropical Vacation" & "Journals & Tags".


The luggage tag was easy to make and it was fun. I used an SCAL file from svgcuts.com . Others in my group where making coconuts and palm trees and titles, so, hopefully, this will be a great addition to the group.


This cut was more challenging because I had higher expecations on what I wanted to and I was trying to overachieve, again. I need to remember that simpler is better! I received the dancer SCAL file from: Dancer Sihouette: http://mycricutscrapbooking.com/2009/03/28/dancer-silhouette-svg/
and the Musical Note from: http://all-free-download.com/free-vector/vector-clip-art/musical_note_2_clip_art_12286.html. I like how this turned out... simple and elegant!

 
Posted by Picasa


For the tag, I use a free font dingbat from: http://cleversomeday.wordpress.com/2009/05/24/new-free-dingbat-font-for-die-cutters/ I loved this file and will be using it many times!

Thanks for looking!!

Wednesday, April 20, 2011

Home Show Demos

These are a couple of the demos I created for the SABA Home & Patio Show last week. Unfortunately, I didn't get pictures of the wood LOVE centerpiece or the configuration tray I complete, they where my favorites! I was so nervous about doing the demo, I completely forgot to take photos! Who would have thought I would forget. Oh well, I will have to make more!


This demo was with Cricut Vinyl. I made this for our Michaels to use at future demos. This is an 18x24 frame with silver poster paper inside to make it look like a mirror. The actual project I demonstated involved the Destinations cart. I cut out the Paris Eifel Tower and used a 16x20 frame with scrapbook paper inside. Very cool but again, no photos.... aye!


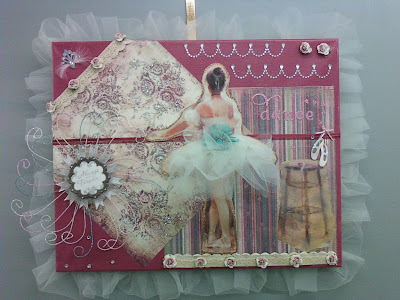
This demo was of altered canvas. I loved making this! I used craft paint, stickers, a ballerina poster, scrapbook paper, bling and lots of toole!


I had a terrific time doing the demo but I learned my lesson with no photos!

Tuesday, February 22, 2011

Compendium of Curiosities Challenge #33

I made this for the Compendium of Curiosities Challenge #33 at Studio L3. I can't say how I used the inks, you will have to purchase Tim Holtz book.

I did not have anything metal so I used aluminium foil and ran it through my Cuttle Bug. I also used the ink to color the ribbon and the rhinestones. I am so excited I can color them now! Anyone who knows me, knows I LOVE THE BLING!! I have a 3lb bag of rhinestones in my drawer just waiting to be used, lol!

I also received my Cricut Swap back today, so I used 2 pieces from the "Things that fly" group. I am sorry, but I don't know who made them because the names where not on the back.

I wrapped the ribbon onto the inside of the card so I would not have to cut the ribbon, so I hide the seam with a cut out stamp and another cut from my Cricut Swap group.
Thanks for the challenge Studio L3! I learned alot!
Posted by Picasa

My Happy List

My husbands Cousin runs a blog call Dandelion Wishes and she posts her Happy List often and offers others to post their Happy List, so this is mine =o)

I like to think that I am a happy person, I just do too much stuff that wears me down, lol! I do believe in the power of Pay-it-Foward and I see everyday how a simple act of kindness can change a persons attitude or day. I work retail and, on a slow day, my store sees approx 700 people come through our doors. We see people of all sorts, the good, the bad and the ugly! The simple act of saying "HI" is free and can be uplifting to a total stranger. I recently finished a book called "365 Thank Yous" by John Kralik, which I already blogged about. This ties into the Pay-it-Forward effect and creates happiness. There are so many ways to create happiness and they are often small and take no time at all. What are some ways you create happiness in your life or others?


I love my Cricut! I love to Craft! I meet so many people because of my crafting. I love the Cricut because I can create anything I want. I love the online community, it offers so much inspiration. It is so much fun!


Meeting Tim Holtz made me REALLY HAPPY! I had so much fun with my manager and being part of the event was awesome! I did feel like a teenager and promised my District Manager I wouldn't squeal like one and I promised not to scare Tim away, lol! I definitely was on my best behavior!


My two cats make me happy! The are so calming and so pleasant. They are full of character and personality, so much fun to be around!


My kids make me happy! Often parents say that their kids get more distant everyday or that they give them headaches or they miss the younger days when they were better. Not me! I do have the best kids in the entire world who still want to be with me and hang out. I am so blessed and grateful! I enjoy every second and I love how my son texts me so much!


My husband makes me happy! We are lucky to celebrate 14 years in a few months and I couldn't imagine them without him!


I have so much more to share that makes me happy but I will save that for another post ;o)


What's on Your Happy List?


Wednesday, February 9, 2011

Thank you card with Glimmer Mist


I am LOVING Glimmer Mist! I made this card using the paper towel/napkin flower technique, ScrapEmboss paper emobosser, ribbon and a few blingy rhinestones. It turned out better than I thought. Every time I turn this card, it looks different in the light, pretty cool! I get a little scared when I start to random ink or spray paper but I will soon get over it. I think the randomness is what makes this so pretty.


Sunday, January 30, 2011

Cricut.com Swap

I participated in a swap at cricut.com, in the message forums. I was a little timid at first because it has been over 10 years since I have done a swap but I am so glad I did! I was accepted into 5 groups, I had to make 10 things for each group. Good thing I was off last week! I am going to mail them tomorrow to the swap hostess who gathers all the pieces and then divides them out, according to the group. In about a week, I will have received 50 handmade pieces to add to my scrapbooks and cards, awesome!! Here is what I made:


Heart:Accent Essentials Cricut Cartridge, chaulk inked edges, ribbon bow, brad, foam "pop" squares.


Butterfly:Once Upon a Princess Cricut Cartridge, chaulk inked edges, googley eyes.


Easter Egg:SCAL Cut File or SVG File: http://www.quillingpatch.com/easter-cutting-files/, chaulk inked edges, ribbon, rhinestone.


Posted by Picasa


XOXO:SCAL Cut File or SVG File: http://www.designhousedigital.com/deena-rutter/oh-darling-cutting-files-freebie-set?cPath=18_25, chalk inked edges, rhinestones, foam "pop" squares.


Posted by Picasa


Horseshoe & 4 leaf clovers:SCAL Cut File or SVG File: http://www.jenniferscrapshack.com/2010/03/st-patricks-day-svgs/, chaulked inked edges, ribbon, foam "pop" squares.


Posted by Picasa

Friday, January 21, 2011

Elegant Cake Cards


I made these cards using the Elegant Cake Cricut Cartridge for the shapes. I used pop-dots to raise the shape up just a bit and added a rhinestone in the middle. The bottom shape was inked on the edges. I didn't have enough of the same blue paper, so for the non-textured blue paper, I used my Cuttle Bug dot embossing folder. Add a bit of ribbon and done. This is fun!
Posted by Picasa

Sunday, January 16, 2011

Paper Flowers

I saw a video on how to make paper flowers with my cricut but I do not have the George cartridge. Here is the video, click here. I went in search of an SCAL svg file of a 5 petal flower and I found this website, click here.

The instructions on both sites were very easy to follow and this is how mine turned out:


This is the first batch I made. I did not add the inking to the edges on the first flower (bottom left) but I did with the others and I like them better. I am diffinetly going to make more!!!
Posted by Picasa

Thursday, January 6, 2011

Christmas Wreath

I made this wreath for a project with the Scrapped Lives Design Team, click here.


This wreath was a lot of fun to make! We were given a file to use with our SCAL/Cricut and we were to make something from it. I wanted to make a wreath. I found some suede paper I purchased long ago and it worked perfect for the deer. I cut the rest of the shapes, added glitter, made a bow and done!

Sunday, November 7, 2010

Sure Cuts A Lot - SCAL

I am excited to say that I am now an affiliate for Crafter's Edge and the Sure Cuts A Lot program for the Cricut! I purchased this program over a year ago and I have used it so much! Some people say that you will not need to purchase another Cricut Cartridage, but I still do because I like to have more options.

The Sure Cuts A Lot (SCAL) program is a versitale program that will let you cut any font in your inventory... if you are like me, I have over 1000 fonts I have collected over the years! There are so many websites out there that offer free files to download to use in SCAL. I have made many projects, including the most recent turkey post, using SCAL. My turkey took me 45 minutes to cut, color and glue together. It took longer to wait for the glue to dry than it did for me to cut the pieces, lol!

If you own a Cricut machine, even the Cricut Cake machine, you NEED SCAL!! Let me know if you have questions and please follow my links so you can help me earn a little play money for my crafting hobbies! =o)

Sure Cuts A Lot information: CLICK HERE
Sure Cuts A Lot purchase: CLICK HERE

Also, once you purcase the program, let me know and I will direct you to some awesome websites you can start downloading from! I will add them to my blog soon as well! Happy Scrapping!!

Gobble! Gobble!


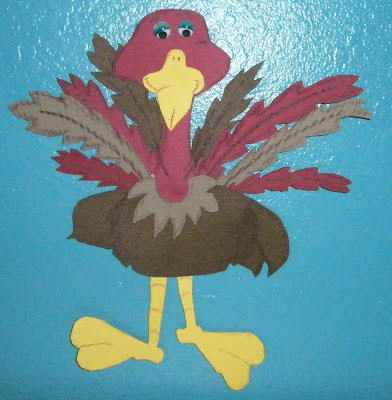
Here is my turkey I made today. I downloaded the .cut file from this website, CLICK HERE. I made it bigger than the original file, so he can sit on the fireplace mantel next to the haystack of Adam & Sarah. He is about 10 inches high and 9 inches wide. I used Sarah's crayons to highlight all the pieces and I found some cute googly eyes to make him adorable! I am glad I made him... now I need to figure out how to stand him up =o)
Posted by Picasa

Friday, October 29, 2010

Peace Sign


This is a fun peace sign necklace I made from my cricut. I found the peace sign image from a Yahoo search and created an svg with SCAL. I then cut it out on pretty scrapbook paper and another on the back, chipboard of a paper pad I purchased. I then MOD Podged them together and done. It turned out so sturdy and pretty.... it was way too easy!!
Posted by Picasa

Friday, October 15, 2010

"My Kids" centerpiece


I started this yesterday and finished today. It was pretty simple, it just took a little bit of TLC time! I purchased the hay bale, the ribbon and the scarecrows at Michaels, on sale. The names of the scarecrows (my kids) I created with my cricut and SCAL using the font Arizona. I asked my son to go outside and find me sticks to use as dowels to hold the names and it looked awesome! It really adding a little something special, since these sticks are from the tree my husband planted when he was 13 years old. I created the pumpkins from my cricut using the Mini Monsters cartridge. I inked the edges of the shapes and then added glitter glue to the leaves to give it a little bit of sparkle. I used my daughters black pastel to create little lines in the pumpkins to give them a bit of detail. Overall, this project cost me under $20 and it was fun to make!
Posted by Picasa

Sunday, October 10, 2010

My Mummy has candy for you!


I made this pumpkin at the Michaels Great Pumpkin Event yesterday. Sarah made the adorable black spider. The mummy is 3 stacked pumpkins, held together with a dowel stick and duck tape. Then I wrapped 5 yeards of muslin around her, topped her off with 3 yards of gauze and some googly eyes and 1 pipe cleaner smile. The sign I made with my Cricut, a cut up box, a dowel stick, a piece of wood from my backyard, silver embossing powder and lots and lots of Mod Podge (you can see the Mod Podge in one of these photos, I used too much at one time and it is taking forever to dry, lol!) The black spider is a painted craft pumpkin with pipe cleaner legs, googly eyes and a pom-pom nose. Sarah didn't want a mouth because it is a cute spider who doesn't bite.

We had so much fun!
Posted by Picasa